Fixing Uneven Settling In Pavers
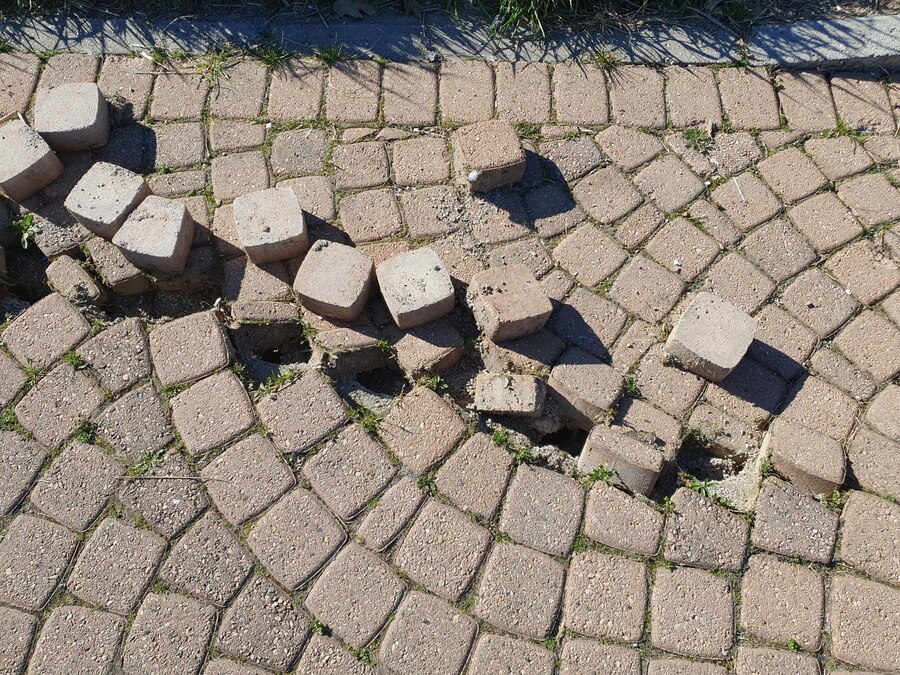
Pavers can make any patio, walkway, or driveway look great, but when parts of it start to shift or sink, it becomes a problem. Uneven settling in pavers isn’t just a cosmetic issue. It can also trip someone up or cause drainage trouble during watering or rain. Over time, the neat, flat surface you first admired can end up bumpy and uneven.
Fixing the settling early can save you from bigger headaches down the road. Whether you’re dealing with sunken spots or raised corners, knowing what causes the problem helps you take care of it the right way. A smooth and sturdy surface not only looks better, it keeps things safer and adds life to your paver area.
Identifying the Causes of Uneven Pavers
Before trying to fix uneven pavers, it helps to know why they’ve shifted or sunk in the first place. Pavers are made to be strong and long-lasting, but the ground beneath them is often why they start moving around.
Some of the main causes include:
– Poor installation: If pavers are placed without a compacted base or proper edge support, they’ll shift over time. This happens more often when the sub-base wasn’t leveled properly or if no barrier was used to hold the materials in place.
– Soil movement: Even with good installation, the soil underneath can settle or expand, especially if it wasn’t packed down properly at the start. Rain, watering, and even digging animals can cause the ground to shift.
– Tree roots: Roots from nearby trees or shrubs often push up sections of pavers as they grow and spread. It might happen slowly and seem small at first, but it eventually leads to raised or cracked pavers.
– Heavy traffic: Areas that see regular foot or vehicle traffic take more pressure and wear. Over time, the weight can push pavers deeper into the base if it doesn’t have enough support.
One common example is a backyard patio that gets used nonstop during summer. If the base wasn’t packed right when it was installed, all that foot traffic, chairs, and grills can lead to portions dipping or shifting out of place.
Spotting these signs early helps create a better plan for repairs. If several areas are affected, it’s smart to handle the whole section rather than just the places that look uneven on top.
Necessary Tools and Materials
Having the right tools and supplies makes paver repairs easier and safer. Here’s a list of what you’ll likely need:
– Flathead screwdriver or paver puller
– Rubber mallet
– Stiff broom
– Level
– Hand tamper or plate compactor
– Shovel
– Sand (preferably polymeric sand)
– Base gravel or crushed stone
– Extra brick units
– Gloves and eye protection
Check the condition of the pavers before reusing them. Some may crack or weaken while others might be fine to lay back down. It’s smart to keep a few extra brick units that match your current layout so the finished surface stays consistent.
Handling paver repairs on your own can seem manageable at first, but it’s not always simple. Hidden issues under the surface like poor soil or water runoff can lead to problems soon after the fix. That’s why hiring someone with hands-on experience is the better choice. They know how to assess the base, identify drainage problems, and take the right steps to avoid repeat issues.
Step-by-Step Guide to Fixing Uneven Pavers
Getting your pavers back in shape can be done with some planning and the right approach. Here are the basic steps professionals follow to get an area level again:
1. Remove the uneven paver: Gently lift the sunken or raised paver using a flathead screwdriver or paver puller. Try not to disturb nearby units to keep the pattern in place.
2. Prepare the base: Once the paver is out, check underneath. Use a shovel to clear any loose or damaged material. Flatten out the area and add gravel or crushed stone if needed. Use a hand tamper or compactor to press everything down until level and firm.
3. Reinstalling the paver: Set the paver back in its original spot. Use the rubber mallet to lightly tap it down without cracking it. A level ensures the height matches the other pavers.
4. Check alignment and stability: Make sure the fixed paver is spaced evenly and snug with its neighbors. Adjust gently if needed using the rubber mallet so the whole row or section flows together.
5. Fill the gaps: Sweep polymeric sand into the joints between the pavers using a stiff broom. Once the gaps are packed, mist the area lightly with water so the sand activates and hardens, locking everything into place.
Fixes done this way stay stable longer and blend in better with the rest of the surface. People walking or driving over them will have no clue that work was even done.
Preventing Future Settling Issues
Catching problems early is one thing, but stopping them from coming back is just as important. These tips help reduce the chance that your pavers settle again:
– Proper installation: The way pavers are laid makes all the difference. A compacted base, edge restraints, and level surface help prevent shifting. If you’re starting from scratch, make sure it’s done professionally.
– Regular maintenance: Brush off leaves, dirt, and debris often. Refill empty joints with sand when needed. Keep an eye out for any movement and handle small issues before they grow.
– Addressing drainage problems: Water underneath a paver surface can cause major movement. If you see pooling, shift your downspout or grade the area so water runs away. Installing a French drain or other drainage fix might be helpful if runoff is a constant problem.
Taking these steps throughout the year isn’t a big job, but they pay off in how your outdoor areas look and feel. Solid maintenance means fewer repairs and a much better experience using your space.
Enhancing Your Outdoor Space
A clean, even paver area invites people to relax and spend more time outside. Whether you’re hosting guests or just enjoying quiet moments alone, a flat and sturdy surface gives you more options. With the right upkeep and small improvements over time, your outdoor space becomes one of your favorite spots.
Ensure your outdoor spaces are safe and beautiful by addressing uneven pavers with the right materials. Mr. Pavers offers everything you need to achieve smooth surfaces that stand the test of time. Discover the strength of quality brick options designed to withstand pressure while maintaining aesthetic appeal. Partner with us to transform your outdoor living areas into favorites you’ll enjoy for years to come.


