Gravel Mix Techniques For Creating Stable Walkways
Building a walkway that stays solid over time isn’t just about stacking the right stones. It starts from underneath, with choosing the right gravel mix. That mix acts as the base, and when it’s done right, it keeps everything above it from shifting, sinking, or becoming uneven. Pick the wrong kind, or skip a few key steps, and you’ll end up with a path full of dips, patches that collect water, or spots where weeds break through.
Gravel mix isn’t one-size-fits-all. There are choices to make based on look, durability, and what kind of weather or foot traffic the path will see. When a walkway is laid out with care and built on a proper base, it holds its shape longer and feels better to walk on day to day. Below, we break down a few techniques and tips to help pick and use the right mix from the start.
Choosing The Right Gravel Mix
Not all gravel is alike. Some types work better on driveways, while others hold up better under walkways and foot paths. Choosing the right gravel mix early on sets you up for a smoother, safer, and longer-lasting surface. It all comes down to size, shape, and how the pieces fit together once laid and compacted.
Here are a few common types of gravel and what they’re best suited for:
– Pea Gravel: This type has smooth, rounded stones. It’s great for decorative use but not the most stable option for walkways that get heavy use. It tends to shift easily under feet unless edged tightly and set into a solid base.
– Crushed Stone: These are jagged and irregular pieces that lock together better. Crushed stone makes a strong, compact base and is often used as the first layer under finer gravel or pavers.
– Decomposed Granite: Finer than crushed stone, this type forms a firm surface once compacted and is ideal for walking areas where you want a flatter, more natural look.
– Stabilized Gravel: This includes gravel treated with binders to lock the particles together, reducing erosion and shifting while keeping a more natural appearance.
When deciding which gravel to use, also pay attention to your local environment. Rain-heavy areas need a mix that drains well. Dry climates can get away with finer materials that wouldn’t wash out as easily. If you’re installing next to grass or flowerbeds, consider gravel that’s less likely to kick out into those spaces.
An example: If your walkway sits along a garden bed and gets used daily, crushed stone with a top layer of decomposed granite could give you the mix of strength and finish you’re looking for. It holds up but gives a smooth top for walking and edging.
Picking the right mix from the beginning means you’ll have fewer problems down the line. It adds stability, keeps weeds from finding room to grow, and helps the path stay even through changing seasons.
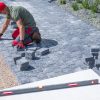
Preparing The Walkway Base
After picking the right gravel mix, preparation is the next big step. Good prep work decides whether your walkway will stay in place or start shifting once the weather or traffic kicks in. Start with a clean and well-marked layout, then move on to digging and layering your surface the right way.
1. Clear and Mark the Area
Outline your walkway path using string, spray paint, or a garden hose. Remove grass, roots, or any debris where the path will go.
2. Excavate With Depth in Mind
Dig down around 4 to 6 inches, depending on how thick of a base you plan to use. The deeper the path, the better the support, especially for areas that see more weight or use.
3. Smooth and Slope
After digging, try to level the bottom surface while adding a slight slope for drainage. You don’t want water pooling under your gravel base. Even a one-inch drop over several feet can help.
4. Install Geotextile Fabric
Roll out landscape fabric across the bottom and up the sides of the trench. This stops weeds from creeping through and keeps the gravel mix from sinking into the soil below.
5. Layer and Compact Gravel Base
Start with about 2 to 3 inches of your chosen base gravel, like crushed stone, and use a tamper or plate compactor to press it down. You want it packed tight so the rest of the materials stay put. Repeat with another thin layer if needed, checking that it stays level each time.
Taking your time with the layering and compacting part makes a difference. A well-prepped base gives the top layer of gravel something firm to rest on, helping the whole walkway stay level. Think of it like a mattress on a solid bed frame. Without that foundation, everything above it can sag or shift over time.
Laying And Compacting The Gravel Mix
Once you’ve prepped the base, it’s finally time to lay down the gravel mix. Start by spreading your chosen gravel evenly across the prepared area. Make sure each part of the surface gets the same amount so the path stays consistent without any soft spots.
Using a rake can help spread gravel more evenly. Begin from one end and work in sections. Raking helps in distributing any excess gravel and ensures there aren’t any thin patches. After spreading, a tamper or plate compactor should be your go-to tool. These are great for packing down the gravel and firming it up, creating a stable surface that holds up to foot traffic. Compacting is a key step since it makes sure that the gravel doesn’t move around much once people start using the path.
A quick pro tip: compact the gravel in multiple passes for the best results. Aim to work in layers of about 2 inches, compacting as you go, instead of trying to push down a thick layer all at once. This method helps achieve a densely packed surface that will support weight well.
Maintenance Tips For Long-Lasting Walkways
Ensuring that your walkway lasts a long time comes down to just a few routine tasks. Regular upkeep can stop minor issues from becoming a big deal later.
– Inspect and Fill In: Every couple of months, check for low spots or areas that might look uneven. Keeping a bag of extra gravel on hand makes it easy to fill these spots up and maintain a level path.
– Dealing with Weeds: Even with geotextile fabric in place, sometimes weeds try to sneak through. A quick pull or spray with a safe weed killer can keep them from settling in.
– Regular Cleaning: Sweep or blow off dirt and leaves that collect on top. They break down into soil, which can help weeds grow and shift the gravel.
– Address Run-Off and Erosion: After heavy rains, check the edges of your path. If you notice washouts, adding extra stones or loosening compacted sections can help redirect the water safely.
Finally, reinforcing the edges with brick or wood borders can help with maintaining shape and stopping the gravel from spreading beyond the path.
Enjoy A Beautiful And Durable Walkway
Crafting a sturdy and stable walkway with a well-chosen and correctly laid gravel mix helps make outdoor spaces both functional and appealing. When gravel mix is selected with care and a base is prepared properly, you extend the life of your path and enjoy easy maintenance in the long run.
Routine checks and minor upkeep go a long way in preserving your work. A gravel path doesn’t just guide feet. It connects different parts of your outdoor area and blends with your garden or landscape seamlessly. With these tips, you’re set to build a walkway that looks good, feels sturdy, and stands the test of time.
When you’re laying the groundwork for a durable and eye-catching walkway, selecting the right materials is crucial. Let Mr. Pavers guide you with top-quality options and in-depth expertise. Discover our diverse selection of stone and other essential landscaping supplies to enhance your outdoor space. Start your project with confidence and build a path that not only complements your home but also stands up to the elements.