Solutions For Keeping Pavers In Place
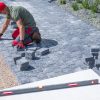
A freshly paved patio, garden path, or driveway can completely transform an outdoor space, but keeping those brick units in place over time is what really makes the effort count. Many homeowners run into problems with shifting pavers, uneven surfaces, or spaces that collect weeds and dirt. These little issues add up fast. Before long, a project that once looked sharp and clean starts to seem unfinished or poorly planned.
That’s why the setup underneath and around your pavers matters just as much as the pavers themselves. Knowing how to keep them steady helps your hardscaped areas stay low-maintenance, safer to walk on, and longer-lasting. From how you prepare the base to what goes between each brick unit, every job needs the right steps to hold up over time. Here’s where to start.
Proper Base Preparation
Think of the base as the foundation for everything that comes after. A well-prepped base keeps your pavers from sinking, shifting, or becoming uneven down the road. Skipping or rushing this step is one of the biggest reasons paver installations don’t last.
Start with the right materials. For most projects, you’ll want:
– Landscape fabric
– Crushed gravel or road base
– Coarse sand (often called bedding sand)
– A compactor
Here’s a simple breakdown of how to prep a good base:
1. Excavate the area where your brick units will go. Take out enough soil to make room for both the gravel and the sand. Usually, digging 6 to 8 inches deep works well for patios or walkways.
2. Install landscape fabric to prevent weeds from growing up between the pavers, while still allowing water to drain properly.
3. Add gravel in layers. Start by pouring in a few inches of crushed gravel, then compact it with a plate compactor. Repeat until you reach the right height. Watering lightly between layers can help the gravel settle better.
4. Check for levelness as you go. It’s okay to create a slight slope (away from your house or other buildings) to help water run off, but avoid bumps and dips.
5. Top it off with sand and smooth it out. This upper layer creates the cushioned bed your pavers sit on. Use a screed board or a long, flat object to spread it evenly.
It’s worth taking your time here. A rushed or uneven base might not seem like a big deal until heavy rain starts washing things around or your once-smooth patio develops uneven spots. One common example is a brick pathway where one section starts to cave in slightly after a few months—not from bad brick units, but from a weak base underneath. Proper prep upfront saves you from bigger fix-ups later.
Edge Restraints That Lock Pavers In
Once your pavers are set down, they need something along the sides to keep everything from shifting outward. That’s where edge restraints come in. These frame your project like a border and help hold every brick unit tight in place, even with foot traffic or slight ground movement.
There are a few types worth considering:
– Plastic restraints – Common for flat projects and curved designs. Lightweight and easy to work with.
– Metal restraints – Provide more strength and stay solid in harsh weather.
– Concrete curbing or poured edging – Strongest option, usually used for driveways or big load-bearing areas.
Installing edge restraints is pretty simple:
1. Once your bricks are laid, clear away extra sand or debris along the outer edges.
2. Lay the restraints snugly up against the pavers.
3. Use long spikes or ground stakes to secure them firmly to the ground. Space the spikes every foot or so for best hold.
4. Add more sand or soil on top to cover them up and improve appearance.
Edge restraints do more than just keep things from sliding around. They also help keep your project looking neat with clean lines and finished borders. Without them, even a level and well-compacted paver job can start to separate or stretch out at the edges over time. These restraints keep everything locked into place and help prevent unraveling, brick by brick.
Using Jointing Sand for Stability
Once you’ve laid down your pavers with a solid base and secured edges, it’s time for the final touch that locks everything together. Jointing sand fills the gaps between each brick unit, providing stability and helping prevent weed growth and ant infestations.
There are different types of jointing sands to consider:
– Regular sand: Affordable and easy to use but may need regular replenishing.
– Polymeric sand: Contains additives that harden when wet, reducing maintenance.
Applying jointing sand is straightforward:
1. Spread the sand over the pavers with a broom, making sure to fill all the joints evenly.
2. Use a plate compactor to vibrate and settle the sand into the joints. This step ensures a snug fit for all the bricks.
3. Sweep away excess sand and dampen the area lightly with a hose, avoiding a strong stream that could wash away the sand.
4. Repeat the process as needed until the joints are tightly filled.
Jointing sand acts like the glue holding everything together. It complements a well-prepared base by adding an extra layer of cohesion. For instance, imagine a puzzle where all pieces fit perfectly snug without gaps. This sand does just that, keeping your outdoor area looking neat and tightly arranged.
Proper Compaction Techniques
Compacting pavers is a critical step in making your project sturdy and durable. It prevents movement and ensures everything stays flat and even over time.
You’ll need:
– A plate compactor or hand tamper
– A rubber mat or protective cover (to protect paver surfaces)
Follow these steps for effective compaction:
1. Cover your compactor’s plate with a protective mat to avoid scratching the pavers’ surfaces.
2. Run the compactor evenly over the entire surface. Work in sections if the area is large.
3. Watch for wobbling and level out any uneven spots by adding more sand and compacting again.
Compaction helps everything bond together, like pressing down hard on a stack of papers so they stick. It ensures your hardscape project feels solid underfoot, even after years of use.
Investing in Quality Pavers and Materials
Finally, the materials you choose can make a big difference in how your project holds up to weather and wear. High-quality pavers are better equipped to resist damage, fading, and chipping. Investing a little extra now often saves bigger repairs later.
Better materials mean:
– Long-lasting color and surface finish even when exposed to harsh elements.
– Superior durability, ensuring each brick unit withstands heavy loads without cracking.
– Consistent size and shape, making the installation smoother and more precise.
Choosing wisely means less hassle down the road. For those looking to create a reliable outdoor space, using premium materials is a smart move that pays off time and again.
Transform Your Outdoor Space with Stability
Proper foundations, tight borders, and filling gaps with care provide what your space needs to shine. Together, these elements form a robust structure that withstands time and changes in season, making your hardscape project both functional and stylish. With these insights, you’re well on your way to enjoying a dependable and beautiful outdoor area for years.
Ensure your pavers remain stylish and secure for years to come. At Mr. Pavers, we understand the importance of using quality brick units and proper installation techniques. Our team provides expert advice and top-notch materials, helping you create an outdoor space that’s both beautiful and enduring. Contact us to get started on your path to a lasting, eye-catching retreat.