Gravel Mix Techniques For Preventing Flooding
Flooding in outdoor areas can sneak up fast. It doesn’t matter if it’s a walkway, backyard corner, or side driveway—when the water has nowhere to go, it pools. That standing water not only causes a mess, but it can also ruin landscaping, wear down surfaces, and even weaken foundations close to the home. Using gravel mix can help steer water away from areas where it tends to collect and soak into the ground more efficiently. It’s a small upgrade that makes a big difference when water tries to overstay its welcome.
Still, just tossing down a few shovels of gravel won’t cut it. Getting the technique right is what ensures the gravel works how it’s supposed to. If it’s layered wrong, too thick, or set on a poor base, it won’t do much to stop water from building up. With the right mix and a thoughtful plan, gravel can create natural drainage paths that keep outdoor areas drier, cleaner, and easier to maintain.
Understanding Why Flooding Happens
Outdoor flooding usually starts with one thing—water that has no place to go. When rain hits hard or the sprinkler system runs too long, that water needs a path to drain. If the ground is packed solid, uneven, or slopes toward your house instead of away from it, water stays put.
Here are some common causes that lead to flooding outside:
– Compacted soil. When the dirt gets packed too tightly, water has a tough time soaking in. Instead, it just runs across the top and tries to settle in the lowest spots.
– Poor grading. If a yard or patio slopes the wrong direction, water travels down to unwanted areas. Driveways or side yards that pit inward become collection zones for runoff.
– Blocked drainage. Leaves, dirt, or debris clogging up gutters or drains force water to spread across the surface instead of being guided away.
– Hard surfaces. Concrete areas or tightly packed paths don’t allow water to seep through. That means more runoff to manage, especially when there isn’t proper drainage nearby.
Flooding can happen anywhere, but problem zones tend to include driveway edges, patio corners, backyard low spots, and garden beds next to walls or fences. Even small dips in the ground can trap more water than you’d expect after a storm.
One example is a backyard with a low spot near the back gate. After a strong rain, that corner becomes a small pond. Without drainage or a material like gravel to let water pass through, it stays soaked for days, killing nearby grass and attracting pests.
Fixing issues like this early helps control bigger damage later on. The idea is to figure out where the water tends to settle, then guide it somewhere else using materials that won’t break down and can handle heavy moisture.
Choosing The Right Gravel Mix For Flood Control
Not all gravel is made the same, and picking the wrong type can keep the water right where you don’t want it. The goal is to choose gravel that promotes drainage without washing away during strong rain.
Gravel types vary by size, shape, and composition. Here’s a breakdown:
– Crushed stone: Known for its rough edges, this makes a stable base because pieces lock together well. It doesn’t shift easily and creates good support beneath driveways and paths.
– Pea gravel: Round and smooth, pea gravel is better for decorative use or light coverage. It’s not the best for areas where you expect heavy water flow since pieces roll around easily.
– Decomposed granite: Fine and compactable, it creates a flat surface. It drains slower than other types, so it’s often used in drier climates or under pathways.
– River rock: Larger and round, it allows water to pass through quickly. However, it doesn’t interlock and may move around if used on a slope without some type of support or barrier.
For flooding prevention, most projects benefit from layering medium-sized crushed stone like three-quarter-inch gravel. It has sharp edges that bite into the layer below and enough space between pieces to let water move through. In many cases, using multiple layers works best — a coarse base topped with a finer top layer keeps stability while improving filtration.
Tips for selection:
– Go bigger for areas that need faster drainage.
– Use crushed, angular gravel to prevent shifting.
– Avoid smooth rock in heavily-used walkways unless bordered tightly.
Choosing the right mix depends on the size of the area, how much foot traffic it sees, and how fast water needs to be redirected. If the wrong gravel is chosen, rain can wash it out or cause pitting beneath, especially if the base isn’t solid. Taking time to match the right material leads to better results and less stress down the road.
Preparing The Area
Successfully using a gravel mix for flood control begins with prepping the area correctly. Skipping steps now can lead to frustration later. To get it right, take time to plan and assess the site’s needs before heading to the materials yard. This prep work is the foundation for effective drainage that lasts.
First up is site planning. Observe how water moves across the area during a storm. Look for puddles, slow drains, or areas that stay wet long after the rain stops. Identify slopes and potential runoff paths so you know where to divert water. Once you have a plan, it’s time to prepare the ground.
Start by removing any existing debris or organic material like leaves and old mulch. Dig down several inches, ensuring you reach a stable layer that will support the gravel. The depth can vary, but around four to six inches is common for most residential projects. After clearing the area, level the surface as much as possible. Grading helps control the direction water will flow, so be sure the ground slopes away from structures like your home’s foundation or garage.
Creating a simple drainage system can prevent water from pooling. Install perforated drainage pipes under the gravel layer in areas prone to heavy water collection. These pipes should direct water to safer locations, like street drains or garden beds far from buildings. Investing in prep now avoids problems with erosion or water buildup later.
Applying The Gravel Mix
Once the foundation is ready, it’s time to lay down the gravel. Applying it correctly ensures water drains properly and doesn’t wash away after every rainfall. Here’s a basic guide:
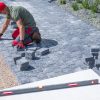
1. Start with a base layer. Use a larger crushed stone as the base, laying it down evenly. Compact this layer thoroughly to create a firm foundation.
2. Add a filter layer. If desired, place landscaping fabric between the base and top layers. This prevents smaller gravel or soil from mixing and maintains clear drainage paths.
3. Lay the top layer. Pour your selected gravel, usually medium-sized and angular, over the base. Aim for a uniform thickness that supports drainage and stability.
4. Finish with a light compaction. Use a hand tamper or similar tool to firm up the surface. While you want it to be stable, it shouldn’t be compacted to the point of stopping water from filtering through.
Smooth out the surface with a rake to ensure consistency without low spots. For areas prone to erosion or high foot traffic, consider adding a border to keep gravel in place. This crafted layer acts as protection against rushing rainwater.
Maintenance Tips For Gravel Areas
Once the gravel is in place, ongoing maintenance keeps everything working well. Without it, even the best-laid plans can falter over time. Regular upkeep maintains the drainage system’s performance and appearance.
To keep gravel areas functioning their best:
– Rake regularly. Level out any uneven spots where water might pool. Keep an eye on the surface after storms.
– Check grading. Over time, settling can lower parts of the surface. Add gravel where needed to restore flow.
– Remove debris. Don’t let leaves, twigs, or dirt block drainage paths.
– Refresh gravel periodically. Even durable gravel needs to be replenished after a while. Look for thinning spots or exposure of the base material.
Staying on top of these small tasks keeps water moving the way it should and helps the area stay clean and safe.
Ending Constant Flooding Issues
Battling outdoor flooding doesn’t have to be overwhelming. With the right gravel mix in place, you can create effective drainage that keeps water away from trouble spots. Spend some time considering your yard’s needs, select solid materials, and your space will stay dry. These techniques prevent flooding without tearing up your whole landscape.
Every home faces different challenges, but making smart choices about ground prep and drainage can solve long-standing issues. When gravel mix is used thoughtfully and maintained over time, your yard stands a much better chance of staying flood-free. Keep your outdoor space strong and worry-free with the lasting power of well-chosen gravel.
Safeguard your property from outdoor flooding with the perfect gravel mix. Mr. Pavers offers an extensive selection of materials to help you design efficient drainage systems and keep your outdoor spaces dry. Explore our quality gravel options that are ideal for flood control and ensure your landscape remains beautiful and secure through all seasons. Discover how our experienced team can help you achieve a flood-free yard today.