Step-by-Step Guide To Preparing Your Garden Base

A healthy garden starts from the ground up. No matter how many hours you spend picking the perfect plants or laying out a design, it won’t matter much if the foundation isn’t right. Preparing your garden base is where it all begins.
When the ground is well-prepped, it sets roots up for success, supports drainage, and helps your layout last longer. Skipping or rushing this step can lead to uneven paths, poor plant growth, and erosion later on. It’s like trying to build a house without a level foundation—you might get started, but you’ll be fixing problems the whole way through.
Late spring is the perfect time to get started on garden prep. The weather is right, the soil is easier to work with, and you still have the full growing season ahead of you. Whether you’re planning a full renovation or making small updates, laying the groundwork now can help cut down on maintenance later. Here’s how to take it step by step and build a base that will support your garden year-round.
Clear the Area
The first part of building a stable garden base is clearing out anything that’s in the way. That includes weeds, old roots, rocks, sticks, dead plants, and any leftover mulch or materials from previous seasons. You want exposed soil that’s clean and level.
Start by removing surface-level debris with a rake or shovel. If there are weeds, make sure to get the roots—just slicing off the top won’t keep them from coming back. Pay attention to hard-to-reach corners and edges. This is a good time to spot any areas that naturally collect water or sit higher than the rest of the yard.
Once the surface is clean, move on to leveling. Grab a basic garden rake and start smoothing out the dirt. For smaller spaces or garden beds, you can do this by eye and adjust as needed. For larger areas, laying out string or using a long board and level can help get everything flat.
Here’s a simple checklist to help with this step:
– Remove any grass, weeds, old plants, mulch, and large stones.
– Dig out roots and check for pests hiding beneath the surface.
– Rake the area thoroughly to create a clean surface.
– Fill any dips with fresh dirt or soil to level the ground.
– Use a tamper or step on the area to gently compact the soil.
Preparing clean, flat ground helps your next layers go down easier and last longer. Too many bumps or soft spots in the base can cause future materials to shift or sink over time.
Outline Your Garden Design
With the space now cleared, the next step is figuring out what goes where. Sketching a garden plan might sound like extra work, but it saves a lot of guesswork later. Grab a pencil and paper or use your phone to draw a simple layout. You don’t need to be an artist. Just include basic shapes and label where you want things like flower beds, walkways, borders, or raised areas to go.
Think about how you move through the yard. If you want walking paths, make sure they have enough room to walk with tools, push a wheelbarrow, or water your plants easily. Place taller plants at the back or center depending on the view, and group together ones with similar water or light needs. Balance is key. You want the layout to look good but also be functional.
Quick tips as you plan:
– Use hoses or ropes on the ground to outline garden beds and paths before digging.
– Make sure there’s enough space between planting areas for walking or equipment.
– Don’t overcrowd planting zones. Leave room for roots to expand.
– Take sloped areas or drainage into account when placing hardscape features.
– Label each space based on its use. That includes sitting areas, tool sheds, vegetable patches, and flower spots.
It’s easier to change your plan now than to move edging or dig up plants later. Taking time to plan it out helps cut surprises once you start building the base and adding materials.
Choose And Install Edging
Now that your garden’s blueprint is clear, it’s time to define borders with edging. This step is like adding a frame to a picture, giving everything a neat and polished look. Different materials can be used for edging, each offering its own advantages. Consider options such as metal, plastic, or stone to fit both the look you’re aiming for and the conditions in your garden.
To start, decide which areas need edging. Common spots include flower beds, paths, and borders between different types of ground cover. Metal edging provides a sleek finish and is great at keeping grass from creeping into your flower beds. Plastic is a more budget-friendly option and is available in various styles. Stone looks natural and can define garden borders beautifully, but it might require more skill to install correctly.
Follow these steps for proper edging installation:
- Outline the edging area using stakes and string for a straight line or use a hose for curves.
- Dig a trench along the outlined path that’s deep enough to hold the edging.
- Place the edging material into the trench, making sure it’s even and level.
- Backfill the trench with soil to hold the edging securely in place.
- Check that everything is level and make adjustments as necessary.
Installing edging keeps your materials contained, giving your garden a tidy appearance and preventing plants or gravel from spilling over into pathways.
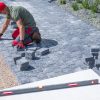
Prepare And Spread Sand Aggregate
Laying down sand aggregate forms the base layer necessary for stability in your garden. This material acts as a cushion for pavers and improves drainage under paved surfaces. The right grade of sand ensures you have a flat, sturdy ground to work on.
Follow this practice for spreading sand aggregate:
– Select the correct type of sand. Coarser sand works well for projects involving paving stones or other hardscape elements.
– Spread an even layer of sand over the area where you plan to build. This should be about two inches thick for most projects.
– Use a straight board or screed tool to level the sand. This ensures the surface is even and prevents future shifting.
– Lightly moisten the sand to help it compact tightly.
– Tamp down the sand using a hand tamper or a plate compactor for larger areas, achieving a smooth, even surface.
This careful prep work stops wear and tear on the materials you lay above it, helping your project retain its good look over time.
Lay The Base Material
With sand spread and leveled, it’s time for the next layer: the base material. This part gives the garden its support foundation, ideal for paths or under paving stones.
You can use gravel or crushed rock as your base material. Here’s how to go about it:
– Spread a layer of your chosen material evenly over the sand. A thickness of about two to four inches is a good range, depending on the load the area will bear.
– Compact the material with a tamper or compactor. Aim for a level surface without giving way under pressure.
– Check the flatness as you go. Make sure there are no peaks or valleys that could lead to issues later.
This base will help distribute weight evenly across your garden, ensuring longevity and stability.
From Plan To Planting
Your garden is now ready to bring plans to reality. With a well-prepared base, you’ll find that future projects will be easier and more successful. The groundwork you’ve put in now means fewer headaches down the road—from paths that stay smooth to plants that thrive.
As you move forward, consider setting small goals. Start planting, adding hardscapes, or installing features like patios or raised beds. Each step builds on the last, leading to a beautiful outdoor area that you can enjoy throughout the seasons. Your garden’s journey begins, and the thoughtful prep you’ve done serves as the cornerstone of all your future efforts.
Prepare your garden to thrive from the roots up with the perfect sand for a stable base. At Mr. Pavers, we understand that a well-laid foundation is key to beautiful, lasting landscapes. Explore our selection of quality materials to ensure your garden is ready to support lush growth and withstand the elements. Let our expertise and reliable supplies help you bring your outdoor projects to life with confidence.