Drainage Solutions Using Gravel Mix
Proper yard drainage doesn’t always get the attention it deserves, until puddles show up or plants start struggling. Whether it’s a soggy lawn after summer storms or runoff flowing toward your patio, drainage problems can sneak up and cause more than a few headaches. They can lead to water pooling in the wrong places, wash away soil, or even affect a home’s foundation if they go unchecked. That’s why it pays to take them seriously and fix them early.
One smart and simple fix for many outdoor drainage issues is using a gravel mix. Gravel is reliable for helping water flow through the ground more easily. It acts like a filter and a path, letting rainwater soak into the soil instead of collecting up top.
Plus, installing a gravel mix doesn’t take special tools or long prep work. It’s good for areas around driveways, planting beds, patios, or side yards where water needs a place to go. It’s also budget-friendly and easy to maintain, making it a go-to solution for homeowners looking to manage drainage issues without adding too much fuss.
Understanding Drainage Problems
Before getting into gravel mix options, it’s helpful to understand how drainage problems show up. A little bit of water collecting now and then might not seem like a big deal, but over time it adds up.
Here are some of the most common outdoor drainage issues:
– Water pooling in low spots after it rains
– Soil erosion from downspouts and roof runoff
– Lawn areas that stay muddy long after a storm
– Hardscapes like patios and walkways shifting or loosening
– Plants or grass turning yellow near soggy zones
These problems usually happen because water doesn’t have a clear place to go. Soil might be too compacted to absorb it, the yard may be sloped the wrong way, or the area lacks a base that helps with drainage. Left alone, poor drainage can erode topsoil, encourage weed growth, and even harm nearby structures.
One homeowner noticed their side yard had become swampy after heavy rains, and it stayed wet for days. That side of the property was lower and didn’t get much sun, so the water sat there longer. After clearing out overgrown plants and adding a gravel pathway with proper grading, the water drained much faster. That single change helped improve the health of their yard and cleaned up a spot that had been a muddy mess for years.
Identifying the issue early gives you the best shot at fixing it before it gets worse. If water hangs around instead of moving through the soil or flowing away, it’s a pointer that something in your outdoor layout could use a tweak.
Choosing the Right Gravel Mix
Picking the right gravel mix depends on where you’ll use it and what kind of drainage you need. Gravel isn’t one-size-fits-all, so understanding the options can help get the best results.
Here are a few popular types used for drainage work:
– Pea Gravel: Rounded and small, great for pathways but may shift a bit more underfoot
– Crushed Stone: Angular pieces that lock together better, often used for foundations or heavy runoff areas
– Decomposed Granite: A finer option that feels like sand but still drains well
– River Rock: Larger, smooth stones that work well in decorative rain gardens or along edges
When choosing gravel mix for draining, think about where the problem is. For a walkway that tends to puddle, crushed stone gives more traction and support. For flower beds or garden borders, pea gravel looks clean and lets water drain easily without compacting the soil.
Your local soil type matters too. Sandy soil drains quickly but may need a denser gravel to slow water down. On the flip side, clay holds water, so coarser gravel with more space between the stones helps it move more freely. It’s also a smart move to look at how much sun and slope the area gets before deciding.
Finding the best match for your space sets you up for success when it’s time to install. The right gravel mix creates a solid foundation for better drainage and it also looks pretty good once it’s in place.
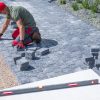
Installation Process of Gravel Mix for Drainage
Installing gravel for drainage doesn’t have to be complicated. With some basic steps, you can create a solid drainage system that manages water effectively. Begin by outlining the area you want to improve. Mark the boundaries and remove any obstacles, like rocks or weeds, to prepare for a clean installation.
Next, you’ll want to dig out the designated space to a depth of about 6 to 8 inches. It might sound like a lot, but this depth allows enough room for both the gravel and water to work together. Ensure the area slopes away from structures to guide water in the right direction. A gentle grade encourages water to run off smoothly rather than collecting in one spot.
Once the space is prepped, add a layer of landscape fabric at the bottom. This helps prevent weeds from growing up through the gravel and keeps the gravel from mixing with the soil beneath. After laying down the fabric, pour in the gravel mix of your choice. Spread it evenly with a rake, starting with a base layer of coarse material to handle the majority of the water flow. Top it off with a finer gravel for a neat finish that blends well with the surroundings.
Compacting the gravel is a key step, as it provides stability and prevents future shifting. You can use a hand tamper or rent a compactor for larger areas. Press the gravel down firmly in layers for better compaction. Doing this right ensures your drainage solution stays effective long term.
Maintenance Tips for Gravel Drainage Areas
Even once installed, a gravel drainage system needs a bit of care to keep things running smoothly. Regular upkeep can help keep drainage problems at bay and extend the life of your setup.
Here are some simple tips to stay on top of maintenance:
– Inspect regularly: Keep an eye out for signs of shifting gravel or pooling water, which may indicate areas needing attention
– Clear debris: Remove leaves, twigs, and other debris that could clog the drainage path. Keeping it clear ensures water flows freely
– Replenish gravel: Over time, gravel may settle or wash away. Add more gravel as needed to maintain the depth and efficiency
– Look for signs of erosion: If any part of the gravel seems to be wearing thin or if soil starts showing through, it might be time for a refresh
Proactive maintenance not only helps your gravel drainage area look its best but also keeps it functioning properly, reducing the risk of soggy patches and water damage. With these simple steps, a little effort goes a long way toward keeping your outdoor space in great shape.
Enjoy A Well-Drained Outdoor Space
By choosing the right gravel mix and following proper installation and maintenance practices, you create an outdoor space that can handle whatever nature throws your way. Gravel’s practical benefits make it a smart choice for those who want an easy and long-lasting drainage fix.
There’s a level of peace knowing your yard is well protected against water issues. A well-drained yard not only looks great but also supports healthier plants and reduces stress on hardscapes like walkways and patios. These steps help you avoid headaches down the road and allow you to enjoy your outdoor space without worry.
So, if you’re thinking about ways to improve drainage, a gravel mix might be the straightforward and smart solution your yard needs. It’s a reliable way to keep your outdoor area dry and functional, no matter the weather.
Ensure your yard stays dry and beautiful with the right solutions. Explore how a well-chosen gravel mix can effectively manage water runoff and enhance your outdoor aesthetics. Let Mr. Pavers provide you with top-quality materials and expert insights to transform your space into a well-drained, appealing haven. Take the first step to protect and beautify your garden today!